Front Desk Info
-

Important Update on RAP 6/25/25
Important Update on RAP
-
Important Update on Event Dates 2026
-
Important Update on Volunteers 5/24/25
volunteers
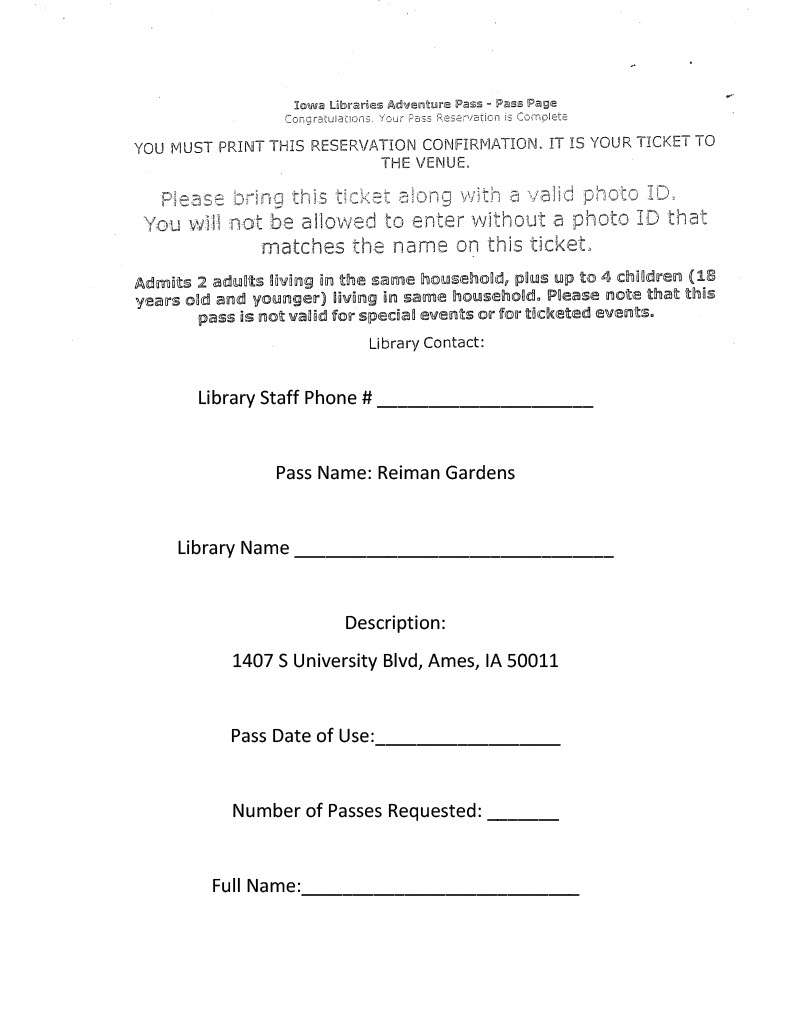
What is this program? An Adventure Pass is purchased by a library in Iowa. It gives libraries the opportunity to give their patrons the ability to “check out” a pass to Reiman Gardens for a day. This is a great way to remain accessible! Good for 4 children and 2 adults.
Guidelines:
1. Person named on pass must be at least 18 years old and have a photo ID to match. If they are under 18, we cannot accept the pass.
2. Passes are only good for general admission (or programs included with admission, like Caterpillar Club). They are not good for classes or events needing pre-registration. This is listed on each participating library’s website.
3. We require a printed pass to accept it. If they did not bring one, do not turn them away. See if they can email it to cashiers@iastate.edu and print it yourself.
4. Passes are good for up to 2 adults and 4 children. Any extra must pay admission.
How to Process:
Check that the name listed on the pass matches the photo ID and are over 18 years old.
Check the date on the form to ensure it is the correct date. The date listed must match the current date.
If they all match, note on the form the number of adults and youth for our tracking purposes.
Put the participating guests into the POS as you normally would. Using the discounts button, select Adventure Pass Adult or Adventure Pass Youth. This will clear the balance to zero. Please note there is no Adventure Pass Senior—they would be considered an adult in this instance.
Put the filled out form in the cash bag for processing.
Adventure Pass Form:
Click here for Full Clover POS Quick Reference Guide
General How To:
View Today’s Sales Total
- Hit the home button (bottom center), then tap the “Reporting” App icon on the home screen
- From the left hand column, select “Sales Overview”
- Be sure the date selected is “Today” – change by click on it and selecting the appropriate item
- If you want to know totals for all sales from only your register, from the menu in upper right corner of screen, be sure “This Device” is selected (Not “All Devices”)
- If you want to know totals for all sales from all registers, from the menu in upper right corner of screen, be sure “All Devices” is selected
- A report will be displayed on the screen.
To Hold and Recall a Transaction (save a transaction not finalized and bring it up later, even on a different register)
Ring up a sale as normal
To Put on Hold…
BEFORE finalizing, hit the “Save” button in the lower left corner (next to “Pay” button)
To Recall….
- If not on the home screen, hit the home button (bottom center), then tap the Orders App icon on the home screen
- Select Order from list
- If list is too long and hard to find……
- Change the drop down menu on the far left side of the bar across the top (under the “Orders” icon)to “Open” by clicking on it and selecting “Open” from drop down menu
- Select the appropriate order from this much shorter list
- Click the “Re-Open” button on right side of screen
- Your transaction as it was saved will appear.
- Add to or change the order as needed (if needed)
- Finalize sale as normal
To Open Cash Drawer – No Sale
- Hit the home button (bottom center), then tap the Register App icon on the home screen
- In the very upper right corner, hit the three dot icon
- Select “Open Cash Drawer” from the drop down menu
- Select “Other”
- Click on “Reason for Adding” Field – type in a reason (it doesn’t have to be a novel, a word or two is fine, but something has to be typed in that field)
- Click the green “Continue” button in upper right corner
- Drawer will pop open
OPENING & CLOSING PROCEDURES
At the start of the day….
Opening Procedures
- Login
Type in your PIN
- If not in the Register App, hit the home button (bottom center), then tap the Register App icon on the home screen
- In the very upper right corner, hit the three dot icon
- Select “Open Cash Drawer” from the drop down menu
- Select “Add Cash”
- Type in the amount of cash you are putting in the drawer
- Click on “Reason for Adding” Field – type in “Open”
- Click the green “Continue” button in upper right corner
- Drawer will pop open – put in cash
- Close drawer – you are ready to take sales!
End of Day Close-out
Closing Procedures
- Hit the home button (bottom center), then tap the “Reporting” App icon on the home screen
- From the left hand column, select “Sales Overview”
- Be sure the date selected is “Today” – change by click on it and selecting the appropriate item
- From the menu in upper right corner of screen, be sure “This Device” is selected (Not “All Devices”)
- A report will be displayed on the screen.
- Print report by tapping the printer icon in very upper right corner of the screen.
- hit the home button (bottom center), then tap the Register App icon on the home screen
- In the very upper right corner, hit the three dot icon
- Select “Open Cash Drawer” from the drop down menu
- Select “Other”
- Click on “Reason for Adding” Field – type in “Close”
- Click the green “Continue” button in upper right corner
- Drawer will pop open
- Count the drawer; note all tender types and their amounts on the white sheet in the cash bag
- Check that “Sales by Tender Types” are matching totals by tender type on white sheet in cash bag
- If they don’t, recount.
- If they still don’t line up, determine where the mistake was made and note it on white sheet
- Place all cash, checks, credit card slips, etc. in the cash bag
- Place the Sales Overview report with the white sheet and cash/ other tender types in the cash bag.
- Log out!!!!!!! (hit the “padlock” icon in very lower right corner of screen)
- Drop the bag in the safe.
ADDING DISCOUNTS TO ORDERS VIA CLOVER
To apply the same discount to the entire order
Enter the number of people per admission category
Click the 3 dots to the right of “On Site Order”
Select “Add Order Discount”
Select the button for the type of Discount
The discount should show up under the subtotal
Complete the transaction
Warning: If you “Add Order Discount” it will apply to the entire order, whether you’d like it to or not. If you only want to apply it to part of an order, see below.
To apply a discount to just part of an order
First, enter the number of people to whom the discount applies
Click on (or press) the line showing their admission, e.g. General Admission x 2 $22.00
On the “Custom Modifier” screen, press “Add Discount”
Select the button for the type of Discount
The discount should show up under the subtotal on the “Custom Modifier” screen
Hit “Done” at the bottom right of the screen
Enter the remaining people in their respective categories
Complete the transaction
Make a Split Tender Sale (Pay for a $36 bill with $20 in Cash and $16 on Credit Card, for Example)
- Ring up sale as normal
- Hit “Pay” button
- In bar above payment options, hit “Split Custom Amount”
- Hit “Custom” button
- Enter amount for first payment on screen that pops up, then hit “Pay” in lower right corner (for example, 20.00)
- Process that payment as you would for that tender type (for example, hit $20 button under cash, then the “Pay Cash” button)
- A Remaining Balance will be displayed – Click “Next Payment” button in lower right corner
- Verify the amount displayed is what goes on the other payment type – hit “Pay” button at bottom.
- Process that payment as you would for that tender type (for example, insert credit card and follow prompts)
- Hit “Done” button in bottom right of screen
Void or Remove an item before finalizing the sale
- Click on the line of the item you want to change the quantity on – a new screen will open
- Hit “delete” button in the lower left corner to delete the item.
- If you’ve already finalized the sale (by pressing “Pay”), you will have to do a refund
Void or Remove an entire transaction before finalizing the sale (to start over, for example)
- Click on the three dots icon above the list of item on the left side of the screen (its right next to the printer icon in the line that says “Current Order (##)”)
- Select “”Delete Order” from the drop-down menu – confirm by pressing “Delete”
- If you’ve already finalized the sale (by pressing “Pay”), you will have to do a refund
Refunds (for people who you give admissions back to because they bought a membership, for example)
- Login
- If not on the home screen, hit the home button (bottom center), then tap the Refund App icon on the home screen
- Select “Look Up Past Payment” button on right side of screen
- Select Order from list – or – search for order
- To search…….
- Be sure the drop down menu on the far left side of the bar across the top (under the “Orders” icon) says, “All Orders” – if it doesn’t click on it and select “All Orders” from drop down menu
- Click in the “Search by Trans # / id” field in the upper right corner
- Scan barcode at bottom of receipt – or – type the number into the field using the on-screen keyboard
- Click the red “Refund” button in upper right corner
- Confirm by clicking “Refund”
- If Cash – drawer will open, count them their cash back
- If Check – drawer will open, return their check
- If Credit – the card will be refunded – no re-swipe is necessary
- Print a receipt for the customer
- Click “Receipts” next to the refunded amount (the lower one of the two available in center of screen)
- Click the “Print” button on the left side of screen – receipt will print
- Click “Done” button
- Exit Refund App by hitting the home button (bottom center), then tap the Register App icon on the home screen to return to the Register
- Logout
Look up Credit Card Receipt for Refunds when they don’t have a receipt (for people who you give admissions back to because they bought a membership, for example)
Note: this will only work for credit card payments – there is not simple way to look up a cash or check sale without the actual receipt – paper or on a phone
- Get the card that they used from the customer
- Login
- If not on the home screen, hit the home button (bottom center), then tap the “Customer” App icon on the home screen
- Click in the “Search by name or phone” field in the upper right corner of the side of screen
- Type in their last name
- Select their name from the list that appears – you will be taken to a screen that outlines all the transaxtions they have done.
- Select the transaction from the list by tapping it – a detail screen with all information will pop up showing what was purchased on that order
- From here you have two options
- Click the “Reissue Receipt” button in upper right to print a new receipt
- Use that to start the process of a refund
- Click “Exchange/Refund” button in upper right to start process of a refund
- This option is faster and easier
- Click the “Reissue Receipt” button in upper right to print a new receipt
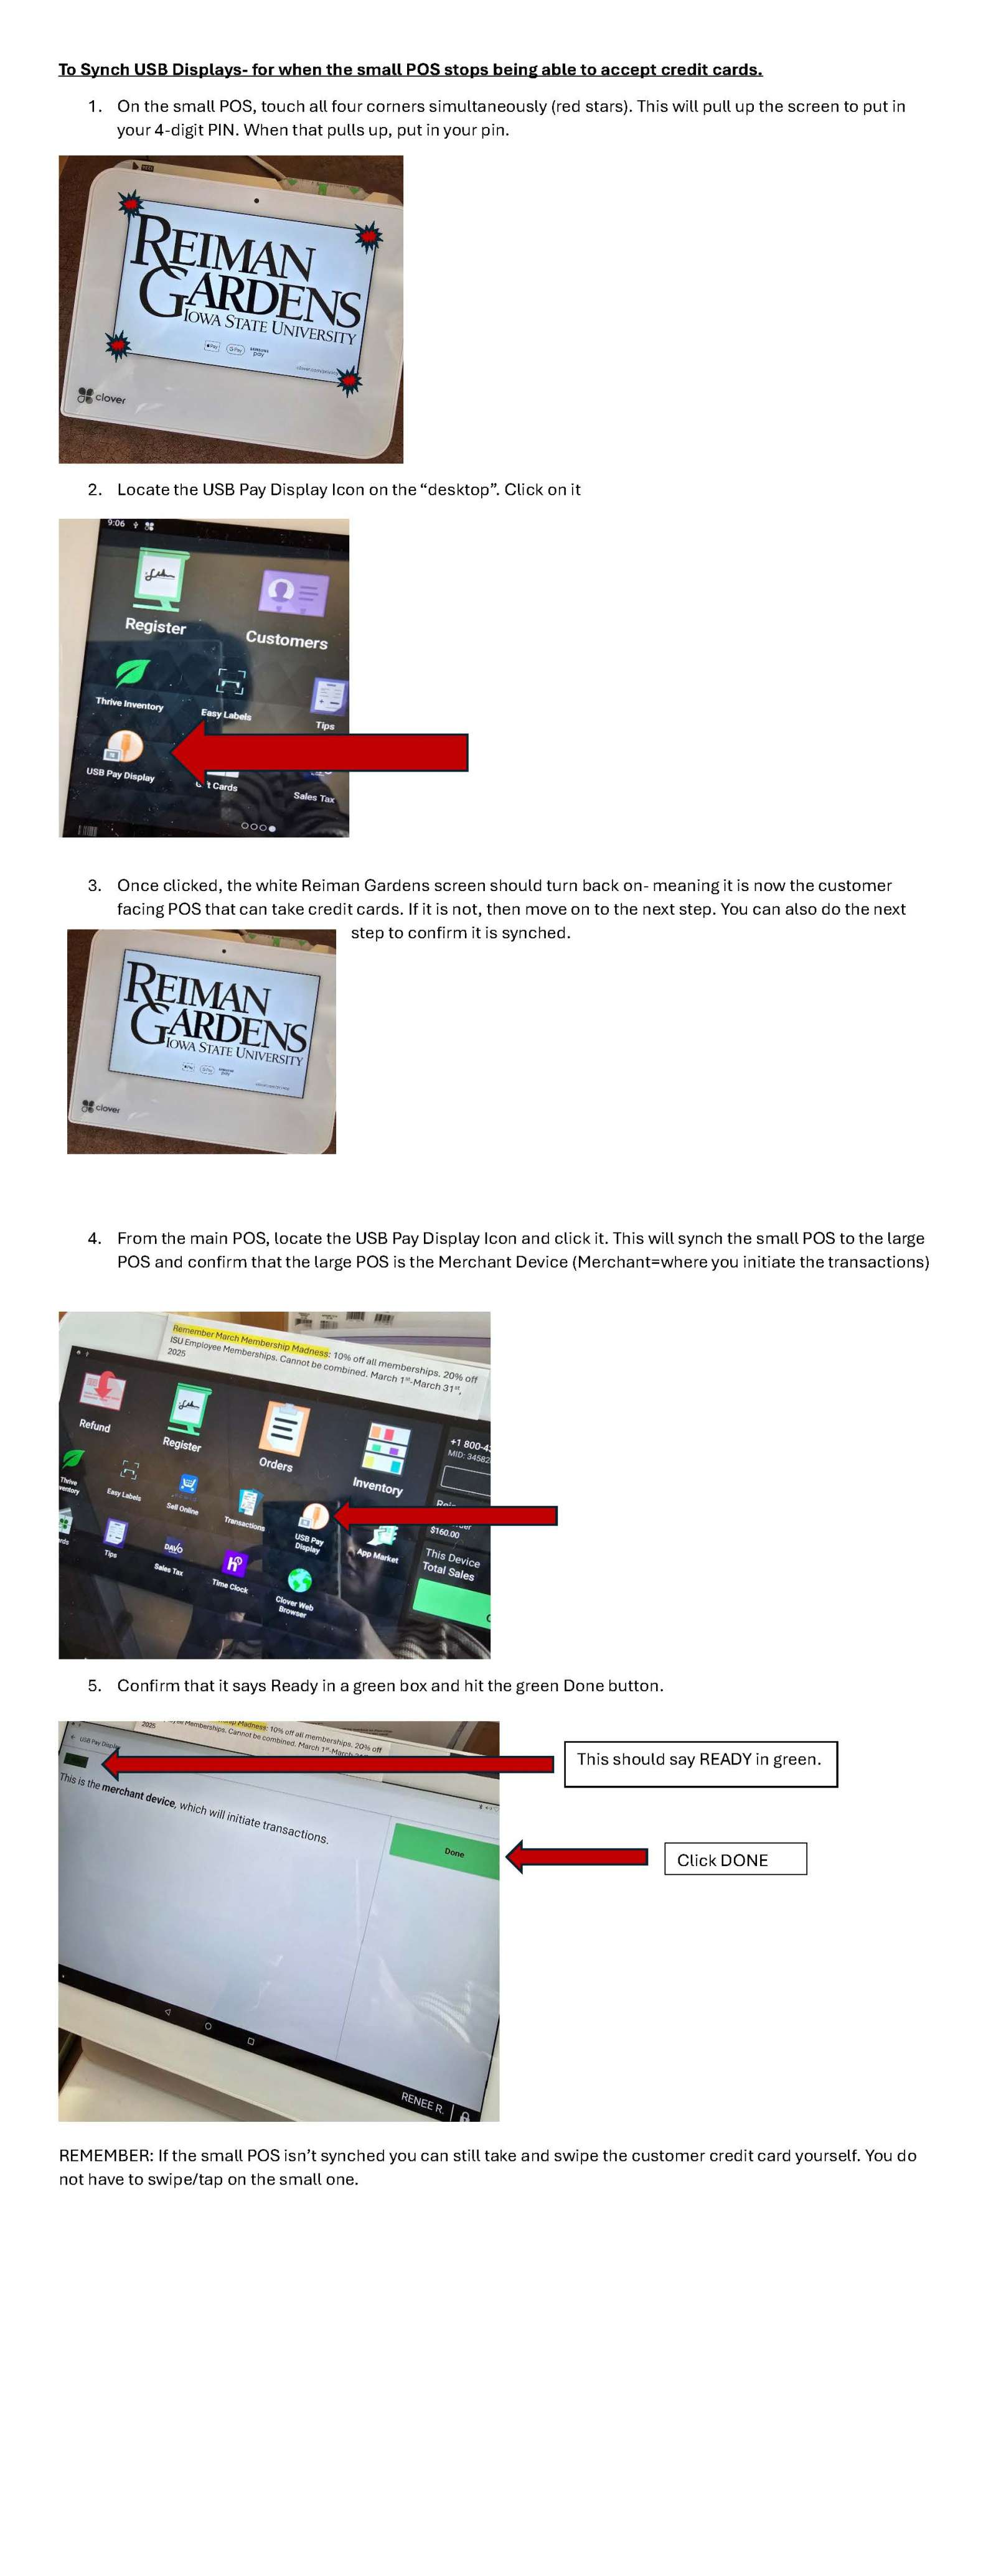
USB Pay Display (Customer Facing POS)
Horticulturist Area Assignments

Who to Call for Horticulture Staff
If you need help with _________ please contact__________
| Benches and Furniture | Jacob |
| Birds and Animals | Jacob, Curtis |
| Equipment | Ed, Curtis |
| Exhibits- Install, Planning | Sarah R. |
| Fertilizer and Chemicals | Ed |
| First Aid Kits | Kris |
| Garden Art- Sculptures | Lindsey |
| Irrigation and Water Features | Sarah, Curtis or Ed |
| Hort Meetings and Agendas | Lindsey |
| Mulch Piles | Ed |
| Grow and Give, Produce | Kara |
| Plant ID or locations | Lindsey |
| Plant Procurement | Sarah or Jessie |
| Plant Sale Extravaganza | Sarah |
| Safety | Sarah |
| Soil, Soilless Mix, Amendments | Jessie |
| Spirits or Winter Wonderscape | Sarah |
| Tools | Jacob, Kara |
| Tree Care Coordination | Kara |
Buck Rose and ISU Heritage Garden Information
- 1999 – 2019 – referred to as the Antique Rose Collection
- The name Verna Nutt was also associated with this space for the first decade or so, but little documentation was kept about the naming.
- The name Verna Nutt Garden name was officially retired in 2024.
- 2009 – The Dr. Griffith Buck Rose Collection was granted provisional status as a national collection with the North American Plant Collections Consortium.
- ~2010 – Canada thistles started invading the Antique Roses and the Buck Rose Collection. Hand pulling was the primary control method.
- 2011 – Jessie Liebenguth became the first area Horticulturist in charge of the rose gardens.
- 2012 – The Dr. Griffith Buck Rose Collections was granted full status as a national collection with NAPCC (now PCN – Plant Collections Network).
- 2015 – Renovating the Antique Rose Garden first appeared as an action item in the Reiman Gardens Strategic Plan (to be complete by 2018). Jessie started developing new concepts for the display. Timeline of changes dictated by funding and garden space priority.
- 2016 – Thistles and rabbits continued to be a primary stress point. Jessie started using careful chemical control on weeds. Carroll Marty built a fence to protect the Buck Rose Collection.
- 2018 – Sarah Rummery became the area Horticulturist for the rose gardens. Complete renovation of the Antique Garden was still a low priority, but the Buck Collection thistle infestation was getting harder to control. Sarah started moving the daylily collection out of the Antique Rose Garden.
- Late 2019 – North garden pathway improved from gravel to concrete. Minor bed and irrigation changes to the Antique Rose Garden.
- 2020 - Horticulture team and Garden leadership agreed to the concept of eliminating the “Antique” roses and changing the bed space to the ISU Heritage Garden – a place to hold all horticultural (non-agronomic) introductions by ISU. This meant moving the entire Buck Rose collection from its current location to the new location, all the while ensuring no one cultivar lost all of its representatives (since we held the national collection and some of the only remaining representatives of these cultivars!). Sarah’s garden team trimmed and sprayed all the rugosa rose on the east end of the Antique Rose Garden bed.
- 2021 – started referring to the space as the ISU Heritage Garden. More weeding. More cleaning out of plants that did not fit the new mission of displaying ISU introductions. Another round of trimming and spraying the rugosa rose, then replanting the east end with about 60 ‘Karl Foerster’ feather reed grass to mimic the adjacent bed to the south (under the tulip poplar).
- 2022 – Ellen Sattler became the new Horticulturist for the rose gardens. She kept weeding and trying to control thistles – often painting the chemical on with a paintbrush so as not to inadvertently damage any roses. Ellen refined the new planting plan layout. Planted Weigela ‘White Knight’ on the east end.
- 2023 – Ellen's garden team finished removing the last of the plants from the old Antique Rose Garden bed (now ISU Heritage Garden), including the very large, old ‘Grace’ smokebush. They tilled the garden bed in May. Ellen spent the rest of the year spraying any residual weeds – about monthly until frost.
- 2024, March – Ellen sprayed the Heritage Garden bed one last time, then marked out the new path through the Heritage Garden. Lindsey Smith, Plant Collections and Records Curator labeled and prepared all the Buck rose plants for transplanting.
- 2024, April – Horticulture staff and volunteers meticulously moved 1-2 plants of each of the Buck rose cultivars from their old bed to the new bed, leaving 2-3 plants in the old bed, just in case transplant death. The transplanting process involved carefully digging and then root washing to completely remove all soil and all entwined thistle roots from the rose plant. About 140 bareroot roses were planted in the new, clean, ISU Heritage Garden bed.
- 2024, May-Sept. – ISU Heritage Garden roses were closely monitored for transplant stress. Plants were mulched, fenced, watered, and liquid fertilized. By the end of September, about 20 of the original plants had died and were replaced from the Buck Rose Collection beds, using the same root washing method. ‘September Sun’ seaside alder was also planted.
- 2024, October – The last of the Buck Roses were dug out of the old Buck Rose Collection beds, approximately 220 individual plants. Some of these plants were transplanted to the ISU Heritage Garden (for a grouping of three). The remaining plants were labeled, potted up, and prepared for overwintering in our nursery. Once empty, the old Buck Rose Collection beds were tilled and sprayed with herbicide. It officially became an extension of the South Mixed Border
- 2024, Dec – The roses in the ISU Heritage Garden were fenced and covered with straw.
- 2025, March – Kara Hetrick became the interim Horticulturist for the rose gardens. The roses were uncovered.
- 2025, May – The roses were lightly cut back and fertilized.
- 2025, June – The roses were evaluated for transplant stress and/or death. About 15 cultivars lost one or both of their representatives. Four cultivars still had representatives in the nursery. 11 cultivars need new plants purchased from known Buck Rose suppliers.
Plants of Interest
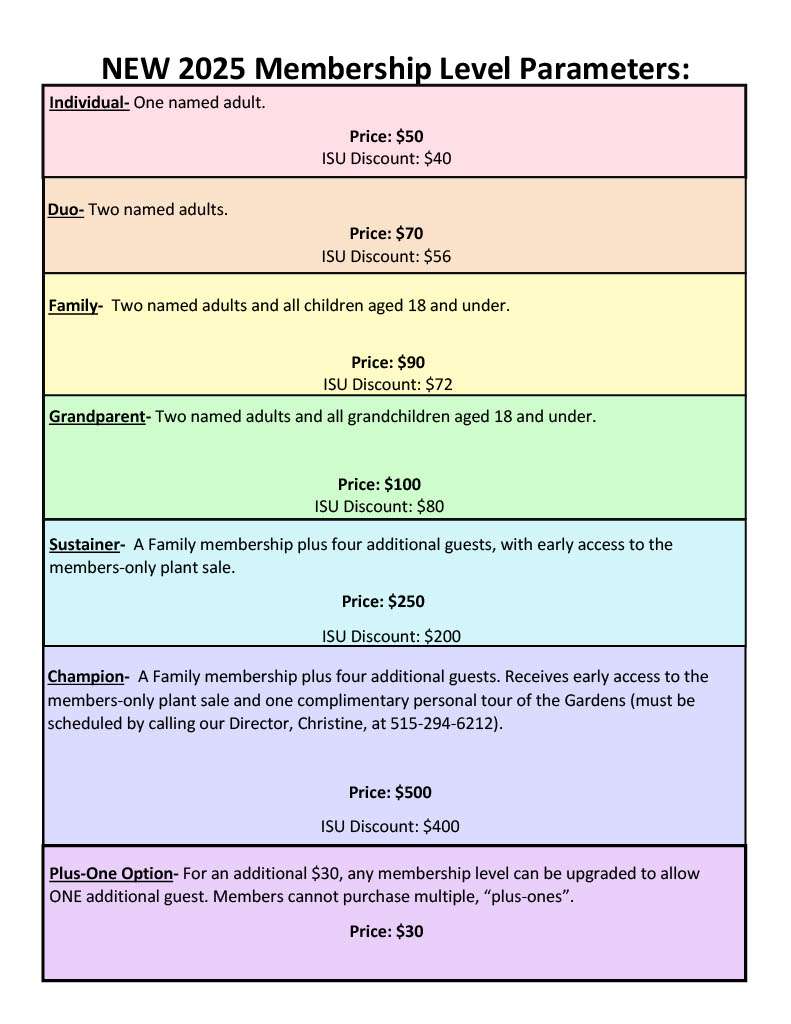
Membership Levels changed on January 1st, 2025
Membership cards with a Plus-One add on will be marked as Plus-One.
Each membership card can only have ONE plus-one add on per card.
If someone wants one name on their card for any level- that’s fine. However, one named membership cards NO LONGER automatically get an extra guest. If one-name members want to bring a guest, they must purchase the $30 Plus-One option. The Plus-One is unspecified and can be a different person per visit.
- Please be sure to only use paper clips for bundling applications and receipts together- do not staple them.
- The receipt should be face up on top of the application when paper clipped together. Do not mix different days together- keep each day for membership transactions separated in their own little envelope.
- Whenever someone purchases a membership (whether regular or gift), an application form is mandatory to fill out. This part is crucial as memberships are considered tax deductible donations. Applications help to match the names of the constituents with payments. This is so that the hard credit can be given to the purchaser for their end of year tax receipt via the ISU Foundation.
- If someone is purchasing a gift membership for someone else, it is mandatory they fill out the bottom portion of the application. This ensures that the gift purchaser receives hard credit.
- When in doubt about anything, call Allison.
New Policy for ISU memberships- we are now allowing folks to apply the 20% ISU discount towards a gift membership if they should choose to buy one for an ISU employee. Front Desk staff can use the ISU Directory to verify employment
The easiest way to check this is to pull up the ISU Directory (bookmarked on your Chrome browser) and put in their name.
If they are an employee, it will show up with a department and a job title. If they are a student, you will see their major and grade level as below.

Frequently Asked Membership Questions and Policies
- Membership cards typically take 3-4 weeks to be mailed out. It can be longer during high membership times.
- ISU Discounted Memberships must name the ISU Employee on the card. It cannot be a spouse of the employee.
- If a membership is paid for by credit card- the cardholders name must be listed on the membership or it is considered a GIFT, and they must fill out the bottom portion of the membership slip.
- Gift memberships for ISU Employees can receive the 20% discount. Please verify they are employed using the ISU Directory.
- Please remember that ISU Alumni do not receive a discount. They must be currently employed to receive the discount.
Selling a Membership
- Login
- Type in your PIN
- If not in the Register App, hit the home button (bottom center), then tap the Register App icon on the home screen
- From the Category list in the center of screen, select “Membership” (or other appropriate category, if necessary)
- Tap the appropriate button at the bottom from list of buttons on the right
- Finalize the payment
- With cash? – Hit “Pay” button, or appropriate “Fast Pay” button, enter amount received, hit “Pay Cash” button
- Drawer will pop open – change amount will display in top right of screen
- Print two receipts, hit “Print” button twice
- One goes to the customer
- One gets attached to the Membership form – put in cash bag
- Hit “Done” button in bottom right of screen
- With Credit Card? - Hit “Pay” button
- On right side of screen click on the button that says “Charge $X.XX on Connected Device” to ‘send’ the payment to the customer facing tablet.
- Customer can apply credit card payment using several methods….
- insert card in slot on upper right corner of tablet
- slide card (if allowed) along upper edge of tablet
- tap card on tablet
- tap phone on tablet (for apple pay, Samsung pay, etc.)
- Customer will be asked to sign using fingertip on tablet and hit “Done” on their screen
- Once signature is done, you will be asked to verify the signature on your screen – hit green “Verify” button in upper right corner of screen
- Customer will be asked to select receipt type – they can enter their own email or phone number on the customer facing tablet or hit print.
- If they print, give them the receipt, then hit print again to print a second copy attach it to the Membership form – put in cash bag
- Or Print two receipts, hit “Print” button twice
- One goes to the customer
- One gets attached to the Membership form – put in cash bag
- Hit “Done” button in bottom right of screen
- With Check? – Hit “Pay” button
- Hit “Check” button”
- Enter in note if necessary, then hit “Continue” button in upper right corner (you can leave the note blank, if necessary)
- Print two receipts, hit “Print” button twice
- One goes to the customer
- One gets attached to the Membership form – put in cash bag
- Hit “Done” button in bottom right of screen
- With cash? – Hit “Pay” button, or appropriate “Fast Pay” button, enter amount received, hit “Pay Cash” button
Logout! (hit the “padlock” icon in very lower right corner of screen)
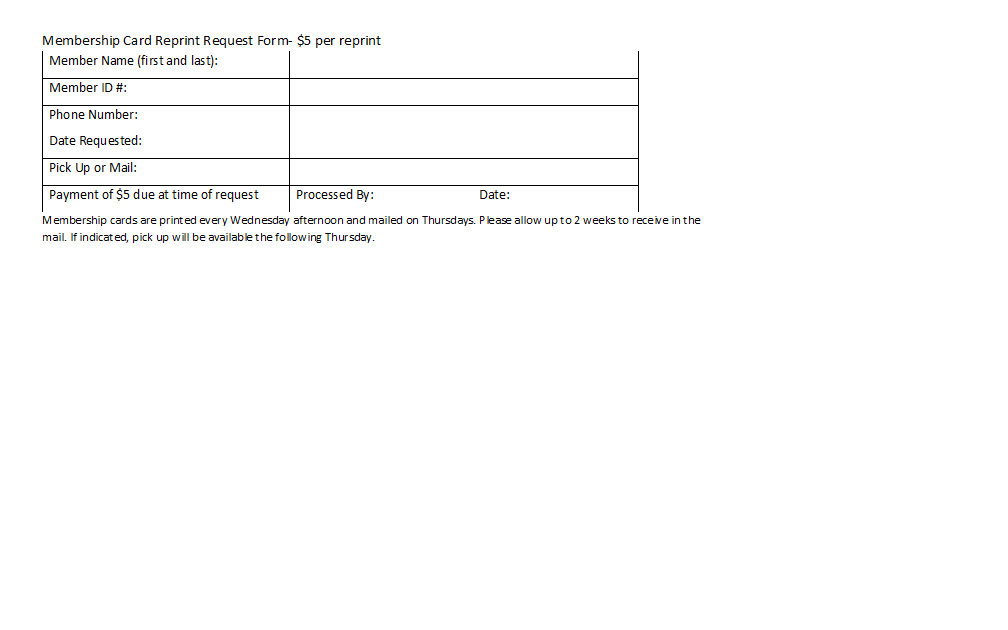
Membership Reprint Cards:
- For lost cards
- Membership level mistakes (purchased Duo, meant to purchase Family)
- Do not charge for membership level upgrades, only for replacement cards
Membership Card Reprint Request Form- $5 per reprint -these are located to the left of the cash register. Please attach a receipt. POS button is Membership Reprint Request.
Organization Memberships
List of Residential/Treatment/Live-In Groups that HAVE Group Memberships and are allowed full membership admission:
- Friendship Ark (Homes), Inc. (expired 4.30.2026)
- Mainstream Living (expires on 5.31.26)
- Optimae (expires on 4.30.26)
- Childserve (expires on 5.31.26)
- Woodward Resource Center (expired on 4.30.26)
These groups don’t have Group Memberships but are welcome to purchase one:
- Ames Convention & Visitors Bureau
- Mosaic
- NAMI
- Youth & Shelter Services
- Carroll Family Resource Center (expired on 3.31.25)
- The Bridge Home (expired on 5.31.24)
- Imagine the Possibilities- Boone (expired on 3.31.23)
- Imagine the Possibilities- Ames (expired on 3.31.23)
This group DOES NOT have an Organization Membership. DON’T let them in! We have previously called their facilities and made this clear to them. Please give them Maddy's card to have their boss call if they show up:
- Genesis
Updated by Maddy Ryan 5.8.2025
Clover POS
Fareharbor
Front Desk Computer
Butterfly Lab Monitors and TV
A/V
- Garden Room
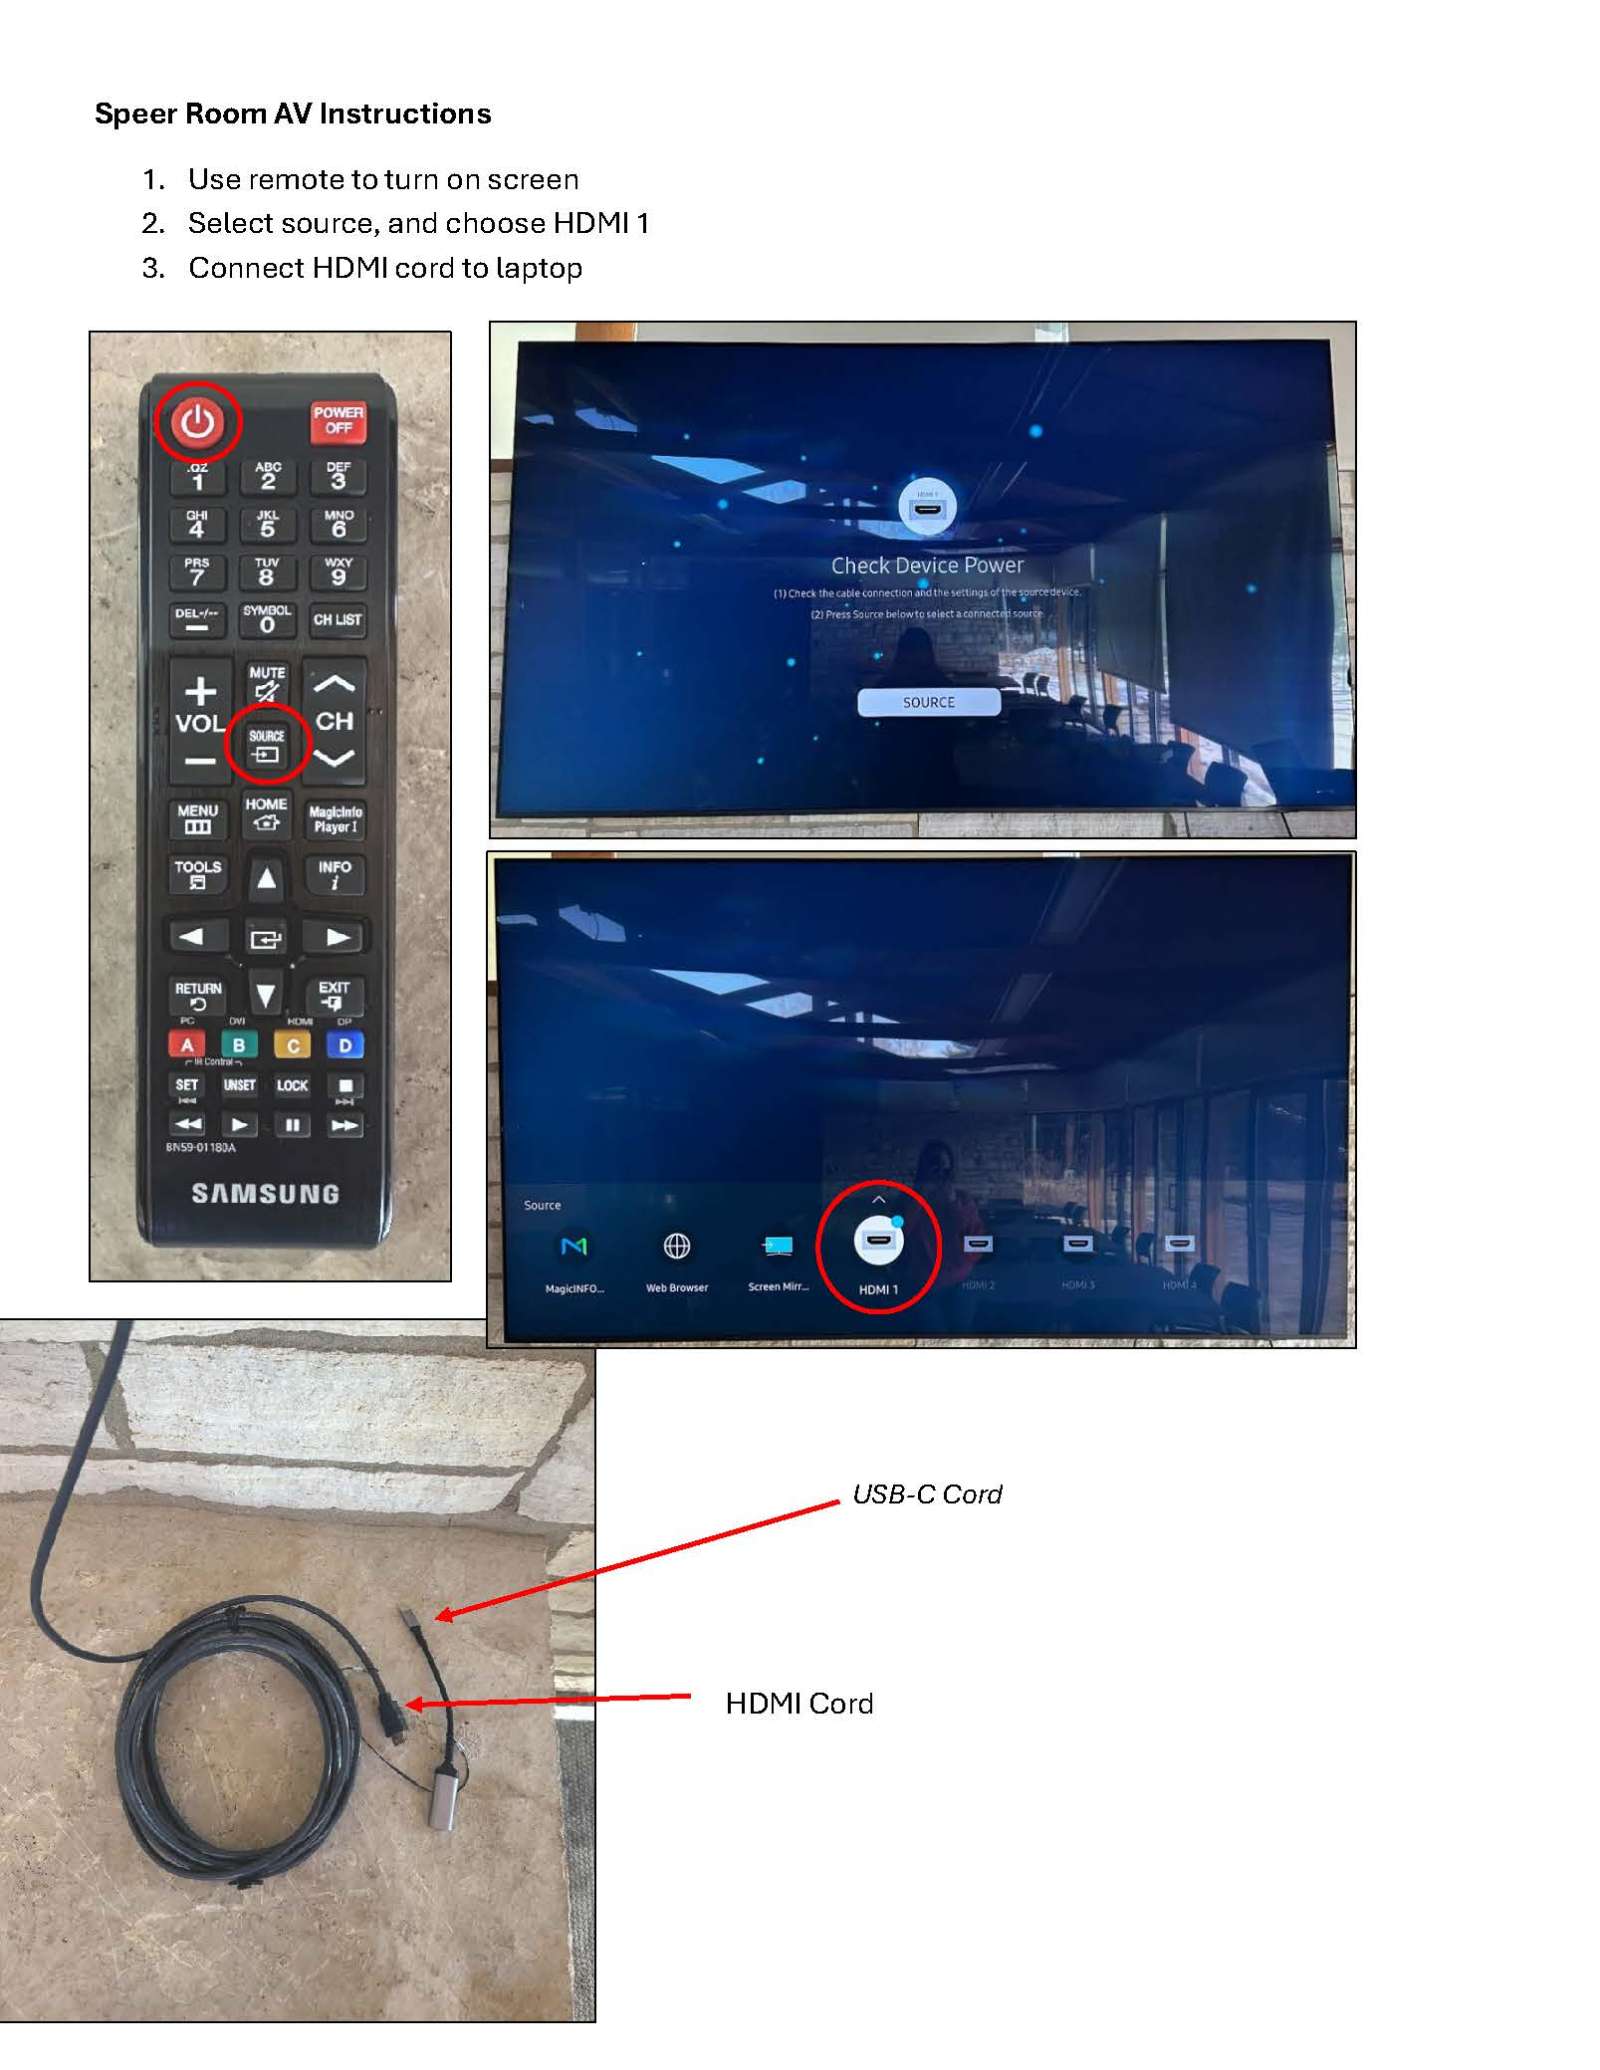
- Speer and Classroom
- Hunziker
- Auditorium
Connecting to Garden Room Projectors via Solstice
Projector input must be on computer 2 and you must be connected to ISUGuest WiFi.
- Computer
- Install the Solstice Client software on your computer
- Iowa State University computers
- Press windows button at bottom left of the taskbar
- Open “Microsoft system center” folder and go to “software center”
- Find “Solstice Client” under the applications tab and download it
- Non Iowa State University computers
- Open a web browser and go to https://www.mersive.com/download/
- Click on the “Downloads” tab at the top of the page and scroll down to “version 4.X downloads
- Click on the appropriate download button for your computer to download the software.
- Iowa State University computers
- Once downloaded, open the Solstice client program on your computer
- Enter the IP address shown at the top right of the projector screen (the IP address for the garden room is 10.25.90.11
- Enter the 4 digit key code shown on the projector screen
- Click the “Desktop” button to project your computer screen onto the projector screen
- Install the Solstice Client software on your computer
- Cell Phone
- IOS
- Install the “Mersive Solstice App” from the app store and open the app
- Enter the IP address shown at the top right of the projector screen (the IP address for the garden room is 10.25.90.11
- Enter the 4 digit key code shown on the projector screen
- Click the “mirror screen” button
- Swipe up to access your control center and click the “screen mirroring” button
- Select the name of the Solstice Client box that you want to connect to (ITS AVXT Test) for the Garden Room
- Enter 4 digit key code shown on the projector screen
- Android
- Install the “Mersive Solstice App” from the app store and open the app
- Enter the IP address shown at the top right of the projector screen (the IP address for the garden room is 10.25.90.11
- Enter 4 digit key code shown on the projector screen
- Click the “mirror screen” button
- IOS
Garden Room Audio Troubleshooting
If the audio is not working in the Garden Room, double check these items:
- Are the appropriate sources routed to the appropriate room? The Garden Room, in nearly all cases needs the “Garden Room Sources” routed to the “Garden Room” (Check audio program on the computer)
- Is the Room volume muted? (Check on the computer)
- Is the Room volume turned down too low? (Check on the computer)
- Is the Source volume muted? (Check on the computer)
- Is the Source volume turned down too low? (Check on the computer)
- Do you have the correct wireless microphone? Those connected to Garden Room sources say “Garden Room” on them. If your microphone says “Conservatory” or “Butterfly Wing” you need to find a different wireless microphone.
- Check the batteries on the wireless microphone. When on, a red light is also on. If no red light is present, the batteries are dead.
- All mics can be charged in the cradle that is behind the Garden Room next to the large black audio computer cabinet. Be sure the microphones sit easily (if you have to push or jam, you’re not doing it right). The red light on the cradle will light and flash when charging.
- I you run into a pinch, you can put regular AA batteries in the microphone – just don’t throw the rechargeable ones away (they are expensive) and be sure to put the rechargeable batteries back in before placing it on the charging station. Replace the batteries if needed by unscrewing handheld mic apart and opening battery door on lapel mic.
- Make sure the paging feature is not active. If the room you are trying to use has been highlighted for paging in the paging menu, it will override everything else. To check, open the computer system, click the “paging” button at the bottom of the window. A button for paging to each room will be displayed. Be sure the button for your room is not selected. Click the room button to toggle between selected for paging (red) and not selected (white).
- Is the button for the paging microphone at the Front Desk pressed down? That will override other settings.
- Make sure the audio receivers are turned on. They are located in the corner cabinet of the Garden Room, near the bottom of the cabinet. They are labeled to never be turned off, but sometimes it happens anyway….turn them on.
Hunziker Screen and Projector
- Grab hook by east facing window
- Hook the hook up into the screen and pull down
- If it is a bright sunny day please close the window covering as well
- Set up projector stand
- Open legs and ensure both side bars are all the way locked down
- Bring up both table ends *the tall side will be on the back*
- Connect the cords - the Hunziker projector uses an HDMI cord
- Connect extension cord to power cord and plug in
- Cover extension cord with cord cover
- Turn on projector
- Ensure the projector is set to HDMI
- If the screen is all janky hit screen fit and follow instructions on the screen
- If possible connect a laptop to the projector to ensure color all looks good
- Take down when event is over *PLEASE KEEP CORDS FOR PROJECTOR IN BAG WITH ITS PROJECTOR*
Projector Bags Should Include:
- Power cords
- VGA cord with HDMI adaptor OR
- HDMI Cord
- Projector itself
